Sewing

Saturday, June 30, 2012

Gift giving 101

One way that I find it easy to save $ for the family is to buy ahead. When I find a deal on a product I use, I buy as many as I might need in the next 6 months or so if I have room for that many. Luckily I have several extra cabinets in my half bath that I use for my pantry and personal hygiene stock pile. Some may think this is strange, I know my husband did when he first saw where I was keeping the cereal, but in a small home you've got to use storage where you can find it!

Another way I save is buy keeping a gift stock pile, which I store in the attic. Our local Dirt Cheap Stores are one place I find a lot of these items for as cheap as 80% off retail. When I find something that fits our usual birthday party crowd, I pick up as many as I'll need for a year or so. I also sew a lot of my gifts for children's parties and adults alike. Sometimes I ask the mother what item they would like, but more often I just surprise them with something. I do this so often, I think they pretty much expect a homemade gift from us. I enjoy making them and they are just as nice, if not more so than a store bought present.


For today's party I almost hate to disclose what I actually paid for the gift, but I guess I will.

The birthday girl and her sister are going on a beach vacation in July, so I pulled 2 beach towels out of the attic and monogrammed their names on them. I paired this with a store bought Melissa and Doug toy that I purchased for 70%off at a local shoe store that has a huge yearly sale - I LOVE the Watermelon Patch!- and viola. Birthday girl gets a fun toy and personalized beach towel, with one thrown in for her sis as well, for only... Wait for it.....$8 plus tax!

Now if I went to the store yesterday and bought just the toy it would have been $20 plus tax. That's why I love my stock pile and why my husband has learned to love it too, even if it is in the bathroom!


Thursday, June 28, 2012

Mama's Prince Charming

Meet my main squeeze. He's at least 21 Pounds ( haven't weighed lately), size 18 months, and 5 months old, he can roll both ways, and has 1 tooth.

His loves are: mommy, cloth diapers, mommy, breastmilk, spalshing his sisters in the tub, and mommy! Not necessarily in that order.

Here is prince charming in his favorite diaper, a softbums omni with a mama made insert inside. His twin sisters (cinderella and snow white) love to call him prince charming on dress up days, so I will too.

His other favorite thing to do is dance with all the princesses at the ball on dress up day!


The cross

During morning playtime Teddy was nailed to the cross, he died and laid limp in TwinS's arms and then he was placed in the tomb, after she got him out of the tomb she used her new doctor set (which consists of a stethoscope, bandaid, and thermometer) to make him feel better. About 10 minutes later her was feeling better.

I know all of this, because she explained it to me, including all those details. For a second, while she was nailing him to the cross (AKA the wall) I thought about stopping her, but decided she was really just trying to process and grasp this new information about death and The Blood of Jesus. The girls have asked me about it daily since bible school a couple of weeks ago.

This morning at breakfast TwinA told me that there were 2 others crosses beside Jesus. She learned that last night during bedtime bible reading with daddy.
I've got to admit, I've wondered how much a 3 year old actually gets from bible school, but I guess now I know- my girls took away at least 1 piece of knowledge- the most important piece. Jesus died on the cross to save us from our sins and if we believe in Him and ask Him to become our Savior, we will go to heaven when we die to be with Him. I'm sure they haven't grasped that information, but they're trying to work out.

I want to thank all the people who worked hard for a week or more to teach my girls and all the other children at Evergreen Baptist Church.

Oh, by the way, teddy has also switched to cloth diapers. Don't you just love his hedgehog one?


Monday, June 25, 2012

Easy inserts


When I originally began looking into cloth diapers for my ds, I liked the idea of cloth diapering and everything I was finding out, except the price. As an experienced seamstress I decided the way for me to cloth diaper would be to sew my own. I began researching the fabric and materials needed for sewing my own diapers, and I learned a lot. The only problem was I had never owned or used a cloth diaper, so I had no idea what features I actually needed. I started by sewing a few flannel fitteds using different free online patterns and tutorials and tried them out on my niece who I kept daily at the time. I liked what I had done so far and continued on in my cd journey and bought some PUL fabric. After a couple of versions, I ended up with a pretty successful pocket diaper. I made tons of inserts from old burp cloths (prefold version) and flannel scraps. I also picked up several thirsties covers NWT second-hand at a great price, and decided I had a good enough stash to start my ds off with.

Over the last 5 months I have learned a lot about cloth diapering. I learned my homemade inserts weren't absorbent enough, I needed to add more layers of absorption, I didn't love pocket diapers, fitted diapers with a cover aren't twice as much work, and most of all that cloth diapering is possible and I do want to make it work.

My chunky ds grew out of those size 1 thirsties duo wraps quickly and my homemade stash of pockets with various types of openings weren't exactly leak free, so I began to shop the sales. I researched a lot and bought what would work for a chubby legged big boy and soon to be much bigger boy. Much to my surprise, i loved all the products I ordered.

So, my advice to all you money-saving sewing mamas out there is to first find what you like and works in your situation, then recreate it!

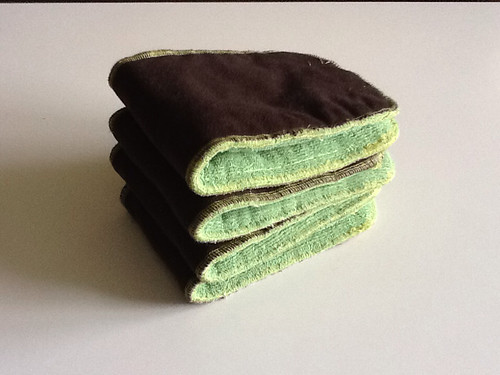
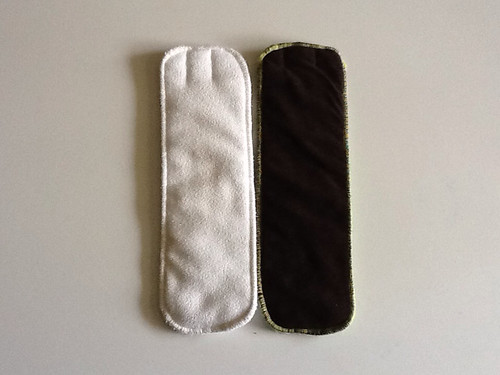
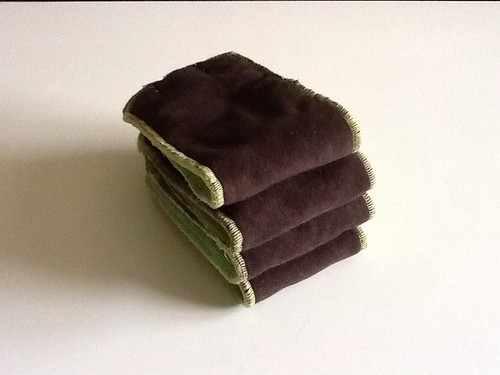
I did just that and now I have a good stash of purchased and homemade cloth diapers and inserts that work well every time. This is an easy insert to make that I modeled after my softbums staydry microfiber inserts.

I knew by reading online that the softbums inserts were 4 layers of microfiber topped with stay dry micro fleece. I had green microfiber kitchen hand towels and brown micro suede in my cd making stash already, so that's what I used. Here are the steps to recreate an insert like this one:

  1. Trace around existing insert to make a pattern
  2. Pin and cut your layers
  3. Pin layers together: stay dry on top then 4 layers of microfiber
  4. Serge edges
  5. Add a male snap (I used mismatched leftovers) to a tag or small piece of fabric
  6. Sew this with the snap facing outwards onto the microfiber side of the insert
  7. Snap in cover and use!
Just on a side note, I love the brown on the top of the inserts! They show no stains, while the white one does.

Here's a price comparison:

Butter suede bought as a remnant. Approximately $0.25 per insert

Microfiber bought as a dish towel . $1.30

Tag $0.25

Snap and thread. I used mismatched bits of snaps leftover from other projects. I'll just guesstimate around $0.20 for both.

That's $2.00 for a homemade insert versus $5.00 for a brand name one. They function exactly the same.


Every little girls' dream

We have a new neighbor across the street, and she had a big tree right next to the power line that needed cutting. So, the power company came out to cut it a little while back and they turned off our power during prime morning play-time without any warning. So, after we observed out the front door and window for a little while, I pulled out my stash of cardboard to entertain the crew of 3 little girls.

I encouraged them to stand the toilet paper rolls on end in the open top box to make it look like a castle. We arrange them all and then add craft glue to hold it all together. TwinA wants to add the castle door and explains where I should put it. We let it dry for a while and then work on the decorations. We start by making the turretts and flags out of pink typing paper. Each girl decorated their own flag with crayons and then I taped them onto a toothpick and dropped it into the hole in the top of the turrett because that is where twinA said they belonged. The last one I tapped to a roll in the back. They glued on Cheerios, which kept sliding down, and also stuck on heart stickers. Lastly, they wanted a princess to go inside, so I drew a prince and princess on paper and folded it so it could stand up inside. It took at least an hour to complete and kept us busy during our power outage. It could have been more extravagant, but the girls ages 3, 3, and 21 months did it themselves and loved it! I'm saving rolls and boxes again, so who knows what we"ll come up with next.

Our castle included:

  • 10 toilet paper rolls
  • 1 paper towel roll
  • 1 stabilizer roll
  • 1 small case box that held canned goods
  • 1 cardboard flap cut from a small box
  • 1 sheet of pink paper
What have you made using recycled materials?


Unexpected visitor

Ok. So be honest! Doesn't this look sort of like a dead mouse! I just closed an open closet door and found this brown dinosaur lying on its side behind the door. Keep in mind that we just returned from an overnight trip. I was startled and it took me a second to realize it wasn't a threatening rodent...thank goodness.

Does this happen to you too?


Saturday, June 23, 2012

Here we go go go!

Well, I finally did it. A blog about being a mommy to two sweet little girls and a handsome baby boy. I'll be posting about sewing and frugal ways to raise and entertain children. More later, because we just parked at the New Orleans aquarium and I'm fielding the "are we here now mommy" questions. Car time well spent. Well as we say in our family, here we go, here we go, here we go go go.